
Here is an excellent session that focuses on the shadow striker. The shadow striker can be one of the two strikers in a twin striker set up, or it can be the #10 attacking midfielder that often finds himself making penetrating runs into the opponent’s back line. Customize and tweak this session to fit your personnel and formation.
This session was recently used by Stuart Sharp with the United States Paralympic Team.
Stuart Sharp is currently the Head Coach of the U.S. Paralympic National Soccer Team. Previously, Sharp was the Director of International Development for BlazeSports America (the legacy organization of the 1996 Paralympic Games) where he worked with Paralympic committees and coaches across the globe to support the development of the sport overseas. Sharp was also the National Development Manager (Disability) for the Scottish Football Association and Head Coach of the Scottish National CP Team from 2005-11. In addition to his coaching credentials, Sharp serves as the Head of Technical Development for the Cerebral Palsy International Sport and Recreation Association, the world’s soccer governing body for athletes with cerebral palsy.
Download Color PDF | Download B&W PDF | Session Planner Permalink
Shadow Striker
1.
Setup:
Two identical set ups as shown. Add tracking defensive midfielder and center back as necessary.
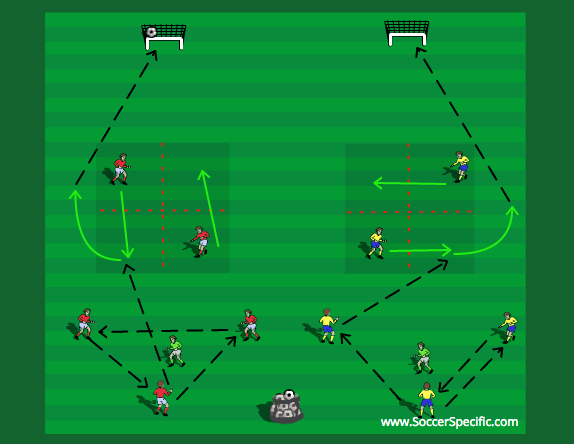
Instructions:
Find rhythm and possession in a 3V1, as the play develops the two center forwards change positions in order to receive the ball. Once they receive the ball they turn tightly and finish on a small goal for accuracy. After a given amount of time, switch the defenders and switch the forwards.
Coaching Points:
- Make sure the two forwards are not in the same plane by working off each others movements
- Midfielders must maintain possession and also recognize the right moment to play an entry ball into the forwards feet based on the timing of their runs, angle of runs, and weight of the pass
- Timing of movement to create space for teammate or to get onto the ball; receiving the ball on a “half turn”
2.
Setup:
12 field players plus two GKs, add the two defenders as needed.
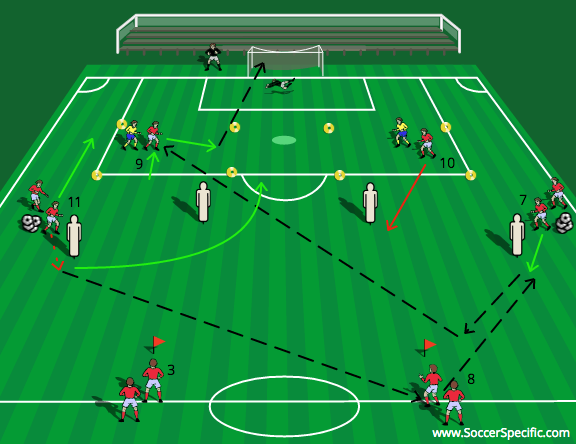
Instructions:
Play is initiated by the winger taking a touch beyond the mannequin and switching the point of attack to the defender, the defender bounces it off the other winger and drives a ball in the air to the center forward. The center forward must control the ball properly and go to goal. Pattern the other side with the same sequence, but as shown the #10 has taken a high starting position and then checks underneath to receive the ball and combine with the midfielders to release either the wide player or link with the center forward.
Coaching Points:
- Starting position of the forwards are very high, focus on quality of runs into the hole or stretching the defense by sitting in behind
- Ball movement and speed of play through the midfield, timing of runs, angle of runs, weight of pass, and execution in the final third
3.
Setup:
6V6 possession, the “dampening zones” are 4X30 areas where players can receive their first touch uncontested, after the initial touch the defender can enter the area.
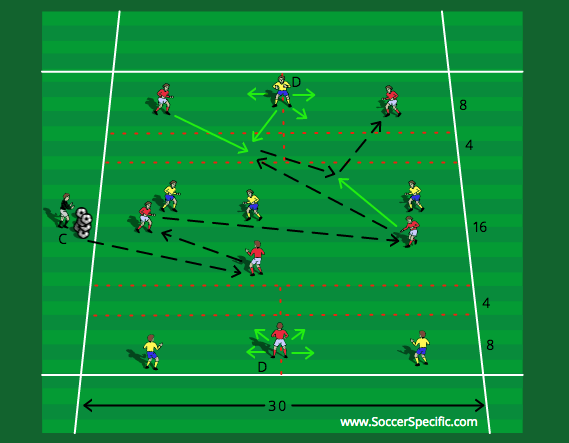
Instructions:
The coach plays a ball into either team, the team that gains possession must connect three passes before they find either of the two strikers with a penetrating entry pass to feet. The forward must find a way to receive the ball and play it to the other forward either directly or via a supporting midfielder. The defender is free to go anywhere but cannot enter the “dampening zone” until a touch has been made. If the defending team wins possession they can immediately link with their forwards.
Coaching Points:
- The two forwards should never be on the same plane
- The forwards can connect directly with each other or combine through the midfield
- Quality of finish on goal, weight and timing of pass, timing of movement to create space for teammate or to get onto the ball, receiving the ball on a “half turn”, and adjust the speed of play according to the runs available and areas of the field as the picture of the opportunities develop
4.
Setup:
9V9 to goal, three zones (3V2, 3V3+1, 3V2). As shown, the two “dampening zones” are placed in two different areas of the field. 2X7 minute games and teams must switch sides thus changing the tactical approach to the game.
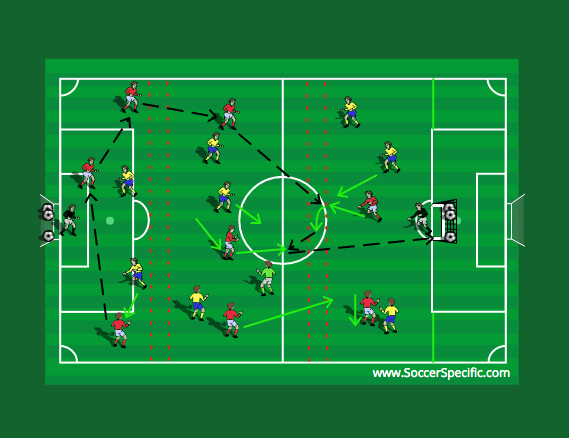
Instructions:
Normal soccer rules apply but players can use the field markings as guidelines. The dampening zones can be used for building from the back allowing the fullbacks to receive the ball, or defensive midfielder dropping in to link with the defensive line, or during attacking final third play by the center forward dropping into the gap between the oppositions defensive and midfield lines.
Coaching Points:
- The main objective remains to play between the lines and link with the center forward to create goal scoring opportunities in the final third
- Weight and timing of pass, timing of movement to create space for teammate or to get onto the ball, receiving on a “half turn”, and adjust the speed of play according to the runs available and areas of the field as the picture of the opportunities develop