
Wayne Harrison specialises in designing training sessions that develop game awareness and quick thinking. A former Academy Director at Blackpool F.C. in the English 2nd Division, he now writes and presents at coaching symposiums worldwide. Harrison holds the prestigious UEFA ‘A’ License as well as a bachelors degree in applied physiology and sports psychology. Several of his books are currently in print through Reedswain and are recommended reading at coaching courses worldwide.
His most recent publication “GAME SITUATION TRAINING FOR SOCCER” is 250 pages of themed exercises and small sided games.
Go to www.SoccerAwareness.com to contact Wayne and to purchase his “must-read” books!
*Note: The following session was adapted from a more extensive Wayne Harrison presentation – the first phase of beginning with 2 center-forwards has been ommitted.
The following session and activities focus on developing attacking play through the use of 3 “strikers”. This may be in a situation where an attcking midfield player pushes on to the opposing sweeper OR where a team plays with 1 true center forward and 2 “wingers”. Wayne offers suggestions on how to adjust your team shape as well as affect the shape of the opposition in the detailed explanations / diagrams below.
Set Up:
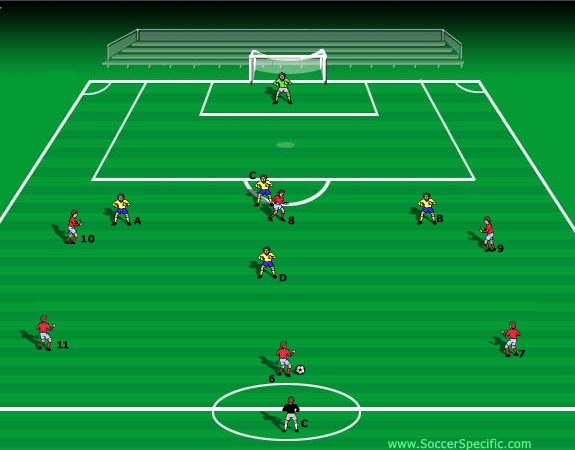
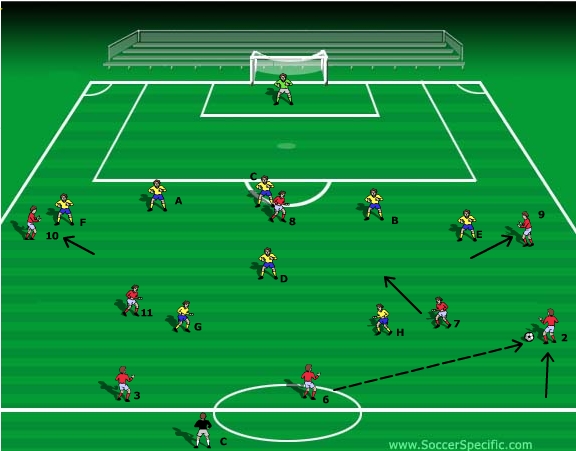
Half pitch with 6 attacking players against 4 defenders and a goalkeeper as shown in Diagram (a) below. Play begins with a pass from the coach (c).
Explanation:
A 3 v 3 situation is the result of pushing the attacking midfield player (8) onto the sweeper. Now the opposition has no cover unless they change their shape (which is unlikely to happen) so we are at an advantage. The sweeper does not like to be man-marked as they are usually the free player so may try to drop deeper to escape the marking thus allowing us to push up as a team and giving us an advantage.
Movement of the 3 front players can seriously affect the positioning of the defenders as they will likely follow them if they usually use a man-marking philosophy. This will create a lot of space to be exploited by us centrally, if they marked zones this disruption of the defense would not happen. We are technically playing three strikers but calling them wingers plants the seed that they need to play wide.
Explanation of Movements:
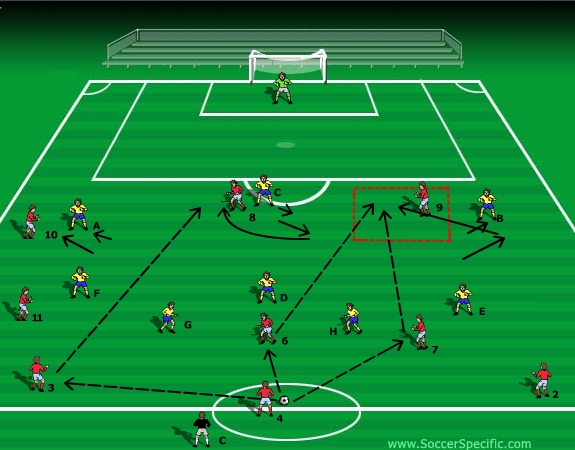
Set the players up in a situation where the two strikers go touchline tight and the attacking midfielder pushes onto the sweeper. Observe what the defenders in a diamond defense do? See Diagram (b) below.
*If they man-mark them they will then we have 3 x 1 v 1 situations in the attacking third with no cover on.
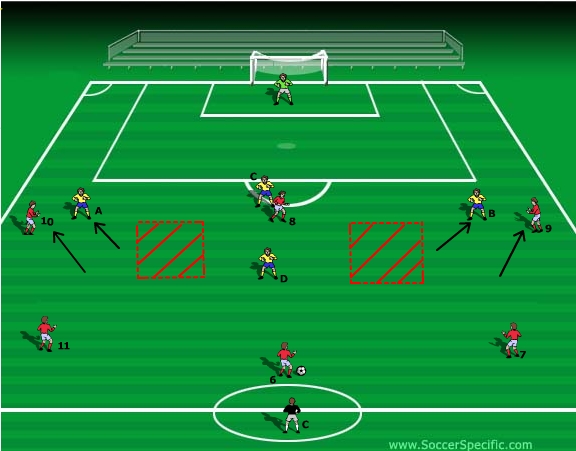
Also, this has created a lot of space (red boxes) inside between the sweeper and the center backs for players to break into and for the ball to be passed into. These spaces are in important parts of the field where players can exploit the man-marking ideas of the opposition. If they mark inside them (zonal) then particularly the two wide strikers are free to receive to feet in space.
*The stopper (D) in this situation often does not know where to go or who to mark.
Progression:
- The session below is all about diagonal movement and passing – getting away from players running up and down the field in straight lines and always passing in straight lines.
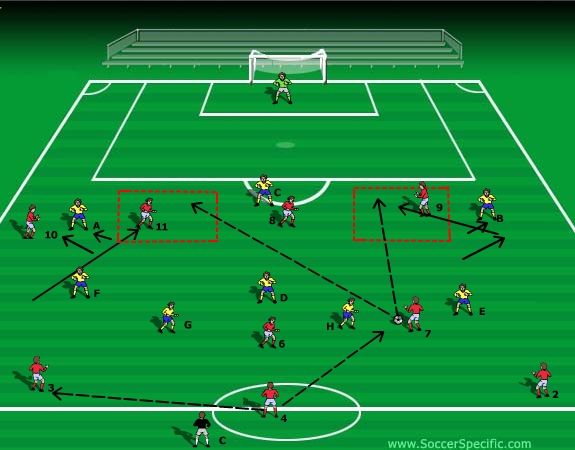
The session takes a lot of work to plant the seed in the minds of the players but it is worth persevering with it. Start position can be (D) passing to (6). Passive defending to start and fewer defenders to gain success. In the above Diagram the wide players have pulled out to the touchline. This has created a channel for (11) to attack. Here (11) has no marker which highlights the movement even more.
The plan is:
- Work with movement of the front players,
- Work with movement of the midfield players,
- Work with movement of the fullbacks.
Additional Movements:
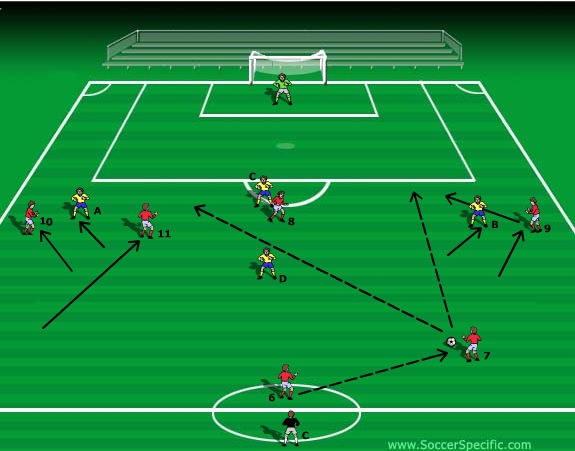
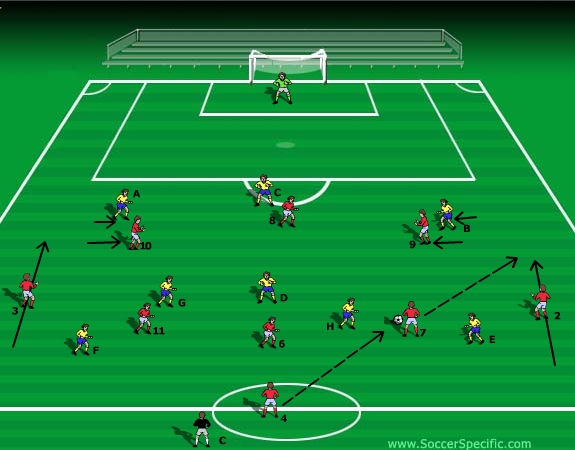
See Diagram (d) below – Movement OFF THE BALL has occurred and the man – marking defenders now are taken into areas they don’t want to go but this creates space centrally for the attacking team to exploit. The defense of the opposition is pulled apart. (8)‘s movement dictates to them all. Strikers / Wingers (9) and (10) time their movement late as the ball is passed from (7) to (6). They each must expect the pass also but at the same time realize their movement may create space for someone else and they must remain unselfish about this.
For the ball to (8) down the side of defender (C), (8) must go late and fast to get away from the marking of (C). Working the opposite run again and checking back. If (8) goes too early he / she closes down their own space to run into and receive the ball thus forcing them to receive with their back to goal instead of being at least half- turned towards the opponents goal and receiving the ball down the side of them to even face forward to shoot at goal or cross the ball in one touch. The momentum of the pass (pace) will help (8).
Continued:
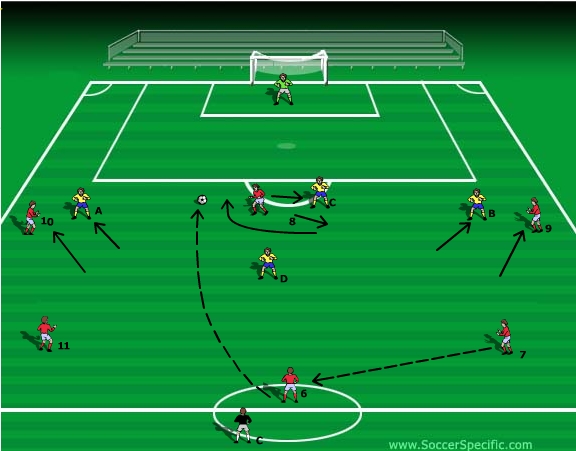
See Diagram (e) below. Here the idea is for players to make runs to create space for their team-mates to exploit. If (B) tracks (9) inside the space is cleared for (8) to make a run into. If (8) is already on the sweeper (C)’s toes then it is a short run to get into position to receive the pass from (7) down the side.

Coaching Points:
- Timing of the run by (9).
- Quality of the pass by (7).
- Timing and weight of the pass by (7).
- Timing of the run by (8) into space, late and fast to escape the marking of (C).
- Angle of runs.
* If (8) goes into the space too early then (C) is taken into that space which means (8) has less room to work in. If (8) has time, move (C) away from the space to come back to create more time to receive the pass and space to run into.
Progression:
- The numbers are increased to 9 v 8 as shown below.
Explanation:
In the situation below the attacking team has created space down the sides in the channels.

Options:
Midfield players may break into those areas or strikers may check back into those areas to receive a pass inside the marking defender. It also creates space for a pass down the side for (8) to receive and attack the sweeper.
The strikers must be unselfish in their play to do this for the team. It can be implemented at certain times during the game to confuse the opposition defenders.
They are making runs to create space for other players not necessarily themselves but if defenders do not follow them then as a consequence of their movement they themselves get free.
Below in Diagram (g) is the same situation except the central defenders stay and mark “zones”.
Since the defenders remain centrally, marking zones, the space is now in the wide areas not centrally as before. Midfield players can link up and support the strikers in these areas to create overloads.

Defensive Team Adjustments
In Diagram (h) below the wide midfield players have dropped back deep to mark the “wingers” of the attacking team.
Teams may do this to counter the attacking action which means full-backs (2, 3) can now attack with ease.
Explanation:
Two forwards pull out wide – Central defenders stay central and mark the space and let the two strikers go wide into wingers positions.
Two wide midfield players drop back to mark them..
The defending team become very defensive now and find trouble getting forward and attacking because they have so many players playing in deep positions.
Spreading the Attack
See Diagram (i) below.
Strikers break wide to become wingers. They create space inside for central striker (8) in particular.
Options:
Wingers can check back inside to receive into the space they created (see #9´s movement above) in the first place. Outside-to-inside run is a great run to make to either receive a pass or create space for a team mate to receive a pass.
(9) takes (B) wide then checks back into the space to offer a second option of a pass from (3).
Can make the pass from a central position too, from (6) for example as shown above.
Getting Midfielders and Strikers / Wingers “In”
See Diagram (j) below. Same situation where space has been created down the sides in the channels. Midfield players may break into those areas or strikers may check back into those areas to receive a pass inside the marking defender. It also creates space for a pass down the side for (8) to receive and attack the sweeper.
The strikers must be unselfish in their play to do this for the team. It can be implemented at certain times during the game to confuse the opposition defenders.
They are making runs to create space for other players not necessarily themselves but if defenders do not follow them then as a consequence of their movement they themselves get free.
Getting Full-Backs “In”
See Diagram (k) below. Now creating space up front for fullbacks to break forward from deep.
Movements:
- (9) checks inside taking defender (B) inside also, creating space outside for fullback (2) to run into and receive a pass from (7).
- Same situation could be worked on the other side with (3). Run has to be late and fast to catch the defenders out.
- (E) may be caught out with this blindside run and not recover quickly enough.